Create roles and configure permissions
Define roles and restrict access permissions of users on Outplay
In a team, there are several roles with varying functionalities that require specific access permissions. On Outplay, you can create customized roles for users and choose what they have access to.
NOTE: Roles and permissions can be configured by an Admin account only.
Outplay’s Default Roles
Outplay has three default roles that can be directly assigned to users or tweaked as per your requirements.
On Outplay, go to Profile → Settings.

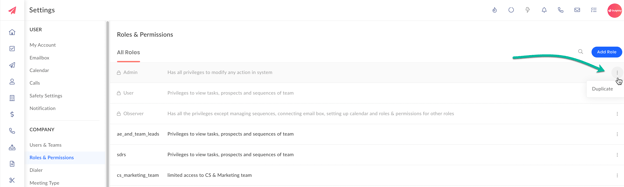
On the Settings sidebar menu, navigate to the Company section and click Roles and Permissions.

Here, there are three default roles available:
Admin: This role has complete privilege to modify settings and take control of the Outplay account in its entirety. For example, an Admin can create sequences, invite new users, configure org settings, assign prospects to users, and much more.
User: This role has limited privilege and permits personal activities on Outplay. For example, Users can create their own prospects and personal sequences. However, when it comes to team sequences, they can only view their tasks, prospects and sequences.
Observer: This role only permits viewing the progress made by other users on Outplay.

Click on a role to view the extent of its capabilities.

On the Permissions page, you can configure the following fields:
Role Name
Description
Permissions

You can authorize permissions for the role by selecting the checkbox for each activity under the following sections:
Prospect
Prospect Account
Sequences
Tasks
Meetings
Calls/ SMS
Opportunities
Templates
Snippets
Website Tracking
Analytics
Settings
NOTE: The roles and permissions of the Admin, User and Observer cannot be modified. However, they can be duplicated and tweaked as per your requirement.
Create a new role and authorize permission
In the Roles and Permissions settings page, Click Add Role.

Define the following fields for the new role:
Role Name: Enter the name of the role you want to create.
Description: Enter a brief description of the role.

Under the following sections, select the checkboxes for the permissions you want to authorize for the role:
Prospect
Prospect Account
Sequences
Tasks
Meetings
Calls/ SMS
Opportunities
Templates
Snippets
Website Tracking
Analytics
Settings
Click Save. The new role is now added.
TIP: By clicking the kebab menu icon, you can duplicate a role and modify permissions as required.
Updated on: 26/06/2024
Thank you!